28 December 2012

Granny Stripes Scarf (Graphic Pattern)


Bufanda de Franjas Granny (Patrón Gráfico)


Several people have asked how to make the stitch for the granny scarf. Actually, it is the same pattern as the granny stripes blanket, which you can find in many places, including Caron: GrannyStripes Afghan. For the scarf, I make the beginning row a little differently, so I thought of drawing a graphic pattern for you:

Varias personas me han preguntado sobre la puntada de la bufanda granny. En realidad, es el mismo patrón que la frazada de franjas de la abuelita, el cual pueden encontrar en muchos sitios, incluyendo Caron (en ingles, con gráfica): GrannyStripes Afghan. Dado que el comienzo lo hago un poco diferente para la bufanda, pensé en dibujarles el patrón gráfico:

Granny Stripes Scarf
(graphic pattern)


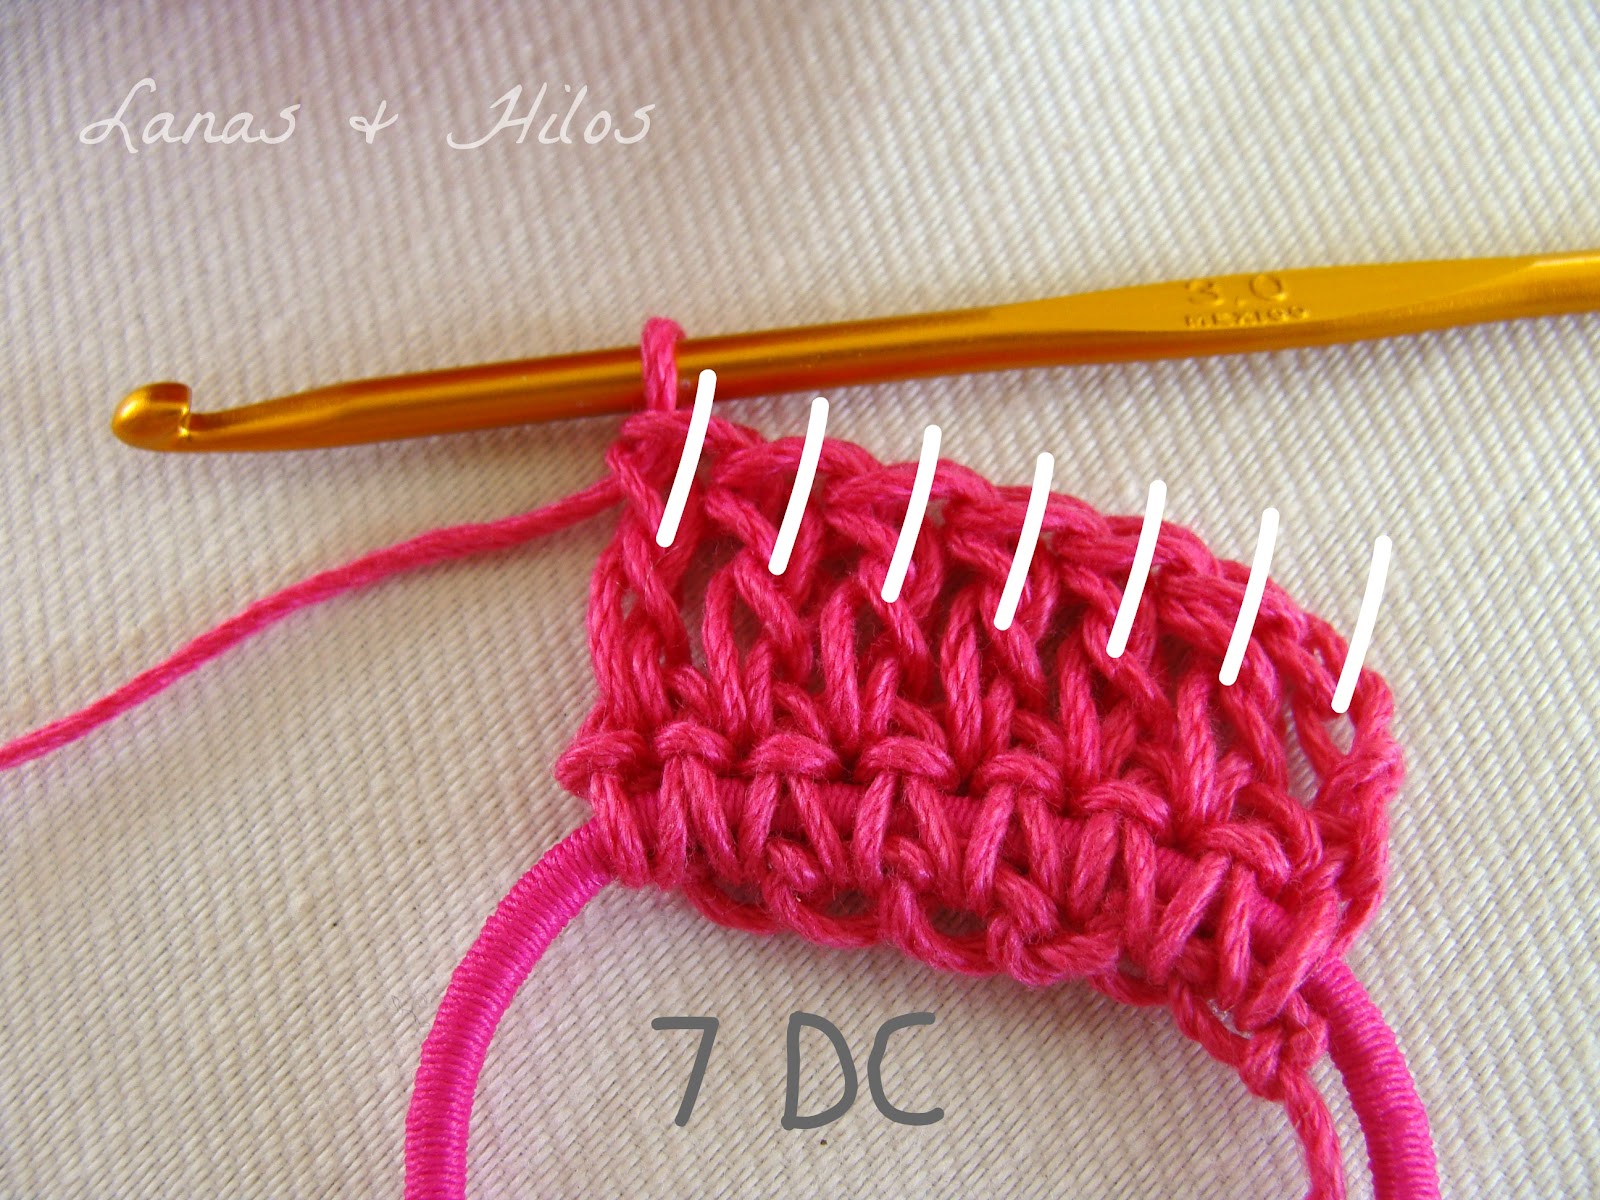
I started with 15 chains, which is on the thin side (for our mild winters). But you can certainly go wider…Just add more chains to desired width (in multiples of 4 minus 1).
Comencé con 15 cadenas, que en realidad es algo angosta (por nuestro clima moderado). Pero también pueden hacerla más ancha, simplemente añadiendo más puntadas hasta alcanzar el ancho deseado (múltiplo de 4 menos 1).


Here are two more Granny Scarves I recently made:
Aquí les muestro otras dos bufandas granny que hice recientemente:


The multicolored is for the daughter of a friend.
La multicolor es para la hija de una amiga.


In bright and pastel colors, with a white background.
Con colores pastel y brillantes, con un fondo blanco.


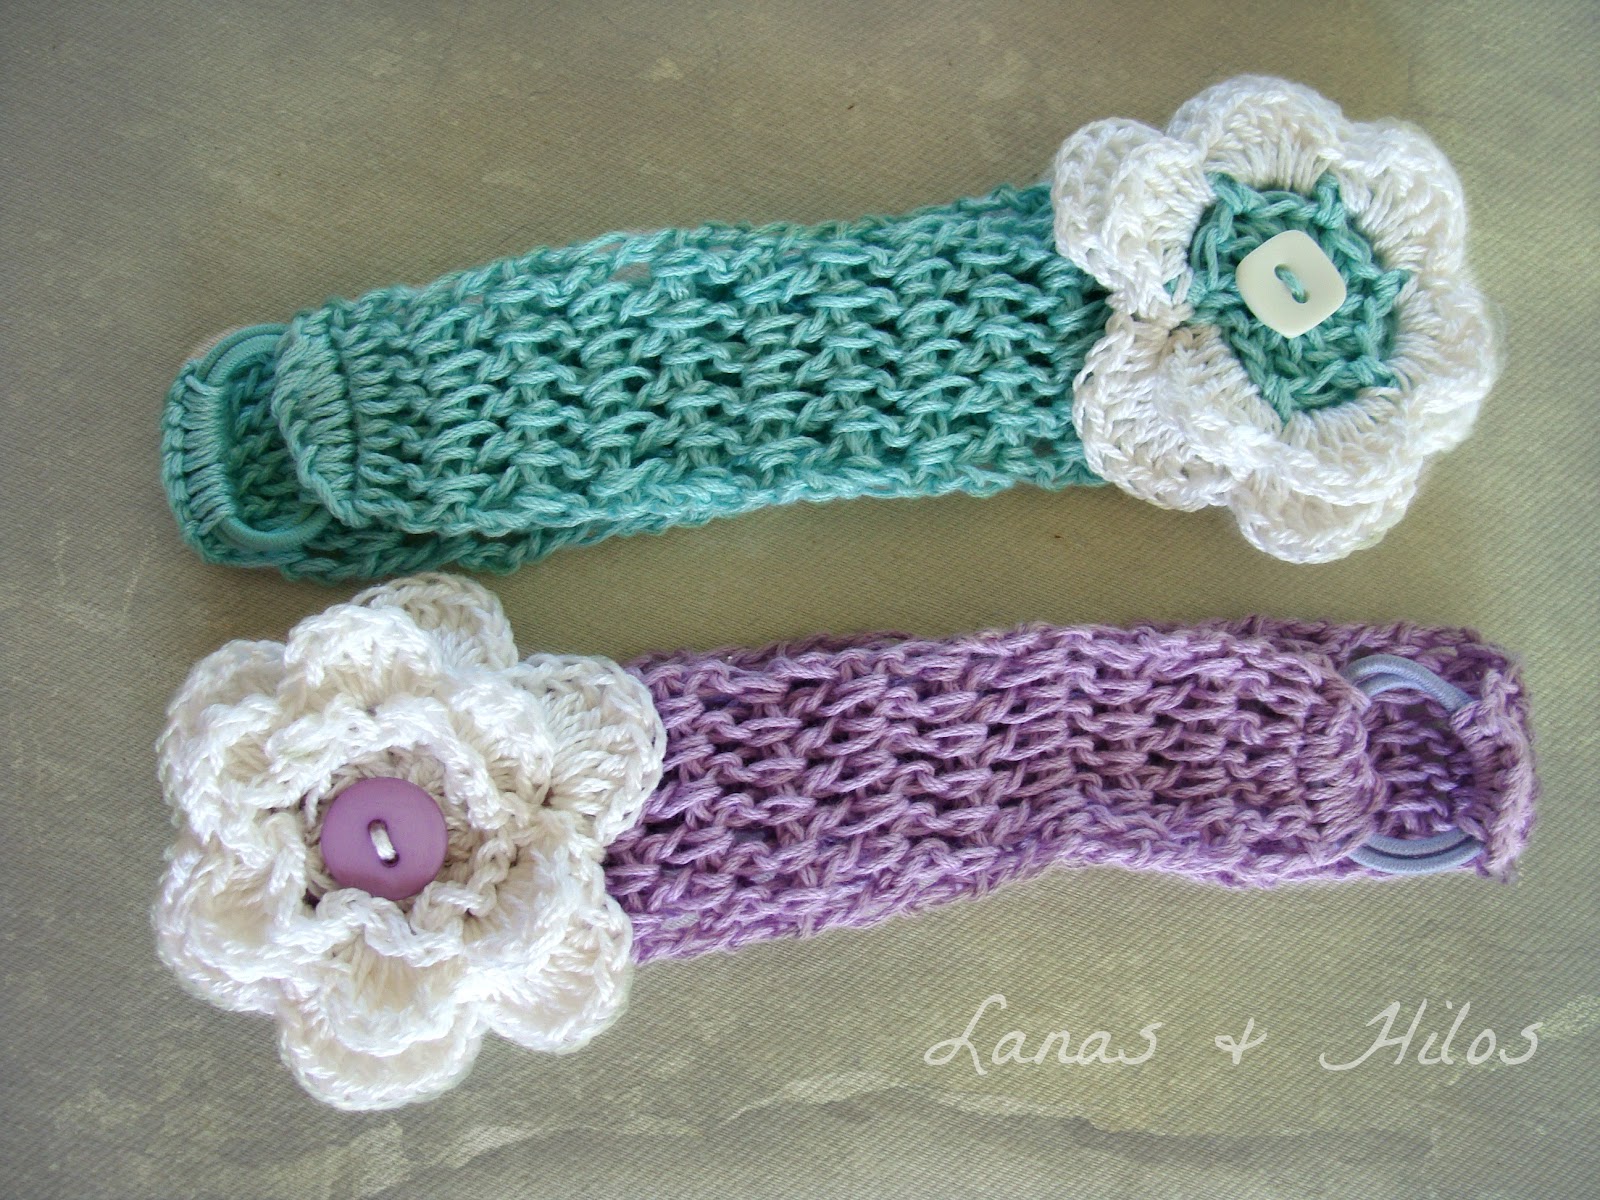
And the grey one is for a young lady. With a matching hat.
La gris oscura es para una jovencita. Con una gorra que combina.


Pattern for the hat: Granny Hat
Patrón para la gorra: Gorra Granny


26 December 2012

Baby Head Bands (Tutorial)


Paso a Paso: CINTAS PARA BEBÉ


Materials:
Cotton yarn (fine or fingerling #2), just a small amount
Crochet needle No. 3 mm
1 elastic band for pony tails
Sewing needle to attach the flower on the band

Materiales:
Hilo de algodón fino (sólo una pequeña cantidad)
Aguja de crochet No. 3 mm
Banda elástica
Aguja para coser la flor sobre la banda


Instructions (Instrucciones):

7 cadenas

* Start with 7 chains (for a wider band, use 9 chains). These chains will serve as the foundation, in preparation to cast on the elastic band on the next row.
* Inicie con 7 cadenas [9 para una cinta más ancha]. Estas cadenas sirven como base para la próxima hilera, cuando los puntos se montan sobre la banda elástica.


por debajo de la banda, 1 cad + pto. simple

Row 1> Make one more chain, and then insert the needle in the 2nd chain from hook. Pass the needle below the elastic band, pick the yarn and finish the stitch on top of the elastic band. Repeat 6 more times. (Total: 7 st)
Hilera 1> Hacer 1 cadena más. Insertar en la segunda cadena desde la aguja, y hacer medio pilar (punto sencillo), montándolo sobre la banda elástica. (Total: 7 p.)


7 puntos simples

Row 2> 3 chains (counts as first dc). Make dc over the sc´s below (Total: 7 st)
Hilera 2> 3 cadenas (cuenta como primer vareta), hacer una vareta sobre cada medio punto. (Total: 7 p.)


7 varetas

Row 3> Chain 3 (counts as first dc). Make 1 dc in the space in between the dc´s below. Repeat in every space. (Total: 7 dc’s)
Hilera 3> 3 cadenas (cuenta como primer pilar / vareta). Hacer 1 pilar en el espacio entre las varetas de la hilera anterior, y repetir en cada espacio. (Total: 7 p)


7 varetas entre varetas anteriores

Row 4 and up> Repeat row 3 until you reach the desired length [Check the chart below for the approximate measures according to age].
Hilera 4> Repetir la Hilera 3 hasta alcanzar el tamaño deseado [Revisar el cuadro abajo para calcular el largo según la edad].

repetir...hasta el largo deseado

Here is list of suggested sizes:
(Note: When measuring, take into account the elastic band as well, not stretched)
A continuación les doy una lista de medidas sugeridas:
(Nota: Al medir, tomen en cuenta la banda elástica, sin estirarla)


casi terminado...

Last row> Finish with a row of sc’s, casting them on to the other side of the elastic band. Be careful not to twist.
Última hilera> Termine con una hilera de puntos simples, montándolos sobre el otro extremo de la banda elástica.


FLOWER (FLOR)
Finally, decorate with a crochet flower, and sew it on the band, close to the top.
Finalmente, decore la cinta con una flor en ganchillo, y cosa en uno de los costados de la cinta.


There are many crochet flower options. You can find free flower patterns in the following links:
Hay muchas opciones de flores en ganchillo. Pueden encontrar patrones de flores (con diagramas o en ingles) en los siguientes enlaces:

* CrochetPattern Central (links to other sites, mostly written instructions)
* My Picot (diagrams)
* JessicaTromp (diagrams)
* Protenska: “3D crochet flower” (written and photo tutorial)

Videos:


See how it looks on a BABY GIRL...
Miren cómo se mira en la cabecita de una bebé...

And check other versions in Ravelry!
Y pueden ver otras versiones en Ravelry!

Now... make and enjoy!
Ahora... ¡manos a la obra, y a disfrutar!

19 December 2012

Granny Star (Graphic Pattern)

ESTRELLA
DE LA ABUELITA
(Crochet)


The graphic pattern of this GRANNY STAR is a gift for you…
El patrón gráfico de esta ESTRELLA DE LA ABUELITA es un regalo para todos ustedes… 


It is not my original pattern, but it is my way of paying forward a gift that Kara from Petalsto Picots gave us last week.  I encourage you to go and check her post: “Granny Star Pattern”, because she has a wonderful story on how she came up with the gift of this cute crochet star.  There you can find the written pattern as well. 

No es mi patrón personal.  Lo comparto con permiso de Kara, del blog Petals to Picots, quien lo compartió en su blog la semana pasada.  Les animo a que vayan a su blog y lean la historia que rodea esta estrella a ganchillo (en inglés).  Allí también encontrarán el patrón
escrito. 


Maybe you can make it as a gift, to pay it forward…

Tal vez puedan hacerla y regalarla, para seguir promoviendo la generosidad… 


14 December 2012

Winter Star

ESTRELLA INVERNAL
(Crochet)


A simple crochet star, in blue cotton.
Una estrella simple en ganchillo, hecha con algodón azul.


Here is the graphic pattern:
Aquí les dejo el patrón gráfico:


When finished, it looks a little bit like a flower; but after blocking it, with pins in the tips, it turns into a star.
Primero, parece una flor; pero al bloquearlo con alfileres en las puntas, se convierte en una estrella.  
I love its simplicity!
¡Me encanta su simpleza! 

02 December 2012

Mosaic Scarf (Pattern)


BUFANDA MOSAICO (patrón)
(Crochet) 

I love scarves with lengthwise stripes, and that is what inspired me to create this scarf…
Me encantan las bufandas con franjas a lo largo, lo cual me inspiró a crear esta bufanda…


Here I am sharing the pattern, in case you want to give it a try:
Aquí les comparto el patrón, en caso quieran probar hacer una (más abajo en español):

PATTERN (English)

Special Stitches:

a.  The MOSAIC SCARF is made with the “Mosaic stitch”, formed by blocks of 3dc´s, which are separated in the next row by 3 chains + sc (between the 3-dc clusters). 

b.  For the first row, I used a special stitch known as “Foundation double crochet” (Fdc).  I prefer this over the chain foundation because it leaves a stretchier border.  It might take longer to make, but it is worth the effort.  If you have not tried it before, check this video in YouTube: Art of Crochet by Teresa - Chainless Double Crochet Foundation


You will need:

Worsted yarn (but you can actually use any yarn you like).  If you want to make a multi-colored scarf, change colors on every row or every other row.  I personally used one contrasting color for all even rows, and used Angora yarn to give it a bit of texture.

Crochet Hook: 5 mm (or the adequate size for your yarn)

Instructions:

1.  Cast on: 200 st, using a “double crochet foundation (Fdc)”.  [Or, if you prefer…you can always make the foundation row with chains, and then a row of dc’s.  But make sure the chain row is loose.  Using a larger hook could do the trick].

2. Turn. With new contrasting color [I personally used Angora yarn, but you can use any yarn you want for contrast], make 1 sc in the first st. * Make 3 chains, skip 3 st and make 1 sc in between 3rd and 4th dc*  (Repeat between * and *). Finish with 1 sc over
the final dc.

Or you can make this chain row in the same color as the previous row, instead of a contrasting color.

3.  Turn.  Join a new color.  Chain 3 (counts as 1st dc).  *3 dcs on 3-ch space*.  Make a dc over the last st.


4> Repeat rows 2 and 3 until you reach desired width. (These samples are not wide because our winters are very mild).

Optional:  Add tassles


Next time, I will show you a “cowl version”, which is my personal favorite…

If you like crochet graphics, this will help you read the pattern (pardon the simplistic drawings!):


PATRON (Español) de la BUFANDA MOSAICO

Puntadas especiales:
 
a. Esta bufanda está hecho con el
“punto mosaico”, formada por bloques de 3 varetas, las cuales están separadas por una fina hilera de 3 cadenas + un punto simple (entre los bloques de 3 varetas) Ver la gráfica anterior.


b. En la hilera base, usé un punto especial conocido como “Vareta de Fundamento” (en inglés: “Foundation double crochet” (Fdc). Es preferable usar esta puntada en lugar de una base de cadenas, ya que es más flexible, en lugar de la base de cadenas que son más apretadas. Lleva más tiempo, pero vale la pena.  Si no han visto esta puntada, les sugiero que vean el siguiente video en You Tube(en inglés):    Art of Crochet by Teresa - Chainless Double Crochet Foundation


Materiales:

* Lana mediana  (pero, en realidad, puedes usar cualquier lana que deseen).  Si quieren hacer una bufanda multicolor, pueden cambiar colores en cada hilera.  Personalmente, yo usé un color contrastante en cada hilera par, y escogí una lana angora para darle textura).

* Gancho: 5 mm (o la adecuada para la lana que vayan a utilizar)

Instrucciones:

1.    Hacer 200 “Varetas de fundamento” (Fdc).  [O, si prefieren…también pueden comenzar con 200 cadenas, y luego hacer una hilera de 200 varetas.  Pero asegúrense de que la hilera de cadenas no esté apretada, lo cual pueden lograr usando un gancho más grande para esa pasada].

2. Voltear.  Con un color contrastante, hacer un punto
simple en la primera puntada.  *Hacer 3 cadenas.  Saltearse 3 puntos y hacer un punto simple entre la 3° y 4° vareta * (Repetir entre * y *).  Terminar con un punto simple en la vareta final.

O pueden hacer esta hilera de cadenas con el mismo color que la previa, en lugar de usar un color contrastante.

3. Voltear.  Unir un nuevo color.  Subir con 3 cadenas (que cuentan como la primer vareta).  * 3 varetas en el espacio de 3 cadenas*  Terminar con una vareta en el último punto.

4> Repetir las hileras 2 y 3, hasta haber alcanzado el ancho deseado.

Opcional: Añada flecos en las puntas.


En la próxima ocasión les mostraré la versión infinita de esta bufanda, la cual se ha convertido en mi favorita...